
Instant Pot Greek Yogurt Recipe {Cold Start}
This Cold Start Instant Pot Greek Yogurt Recipe is an easy and budget-friendly choice for a healthy Instant Pot recipe for breakfast.
When I bought my Instant Pot, I didn’t open the box for 3 months.
We didn’t grow up with a pressure cooker and I had never used a pressure cooker myself, so I was majorly intimidated.
After the first few recipes, I was an Instant Pot convert (especially with the crazy-easy-to-peel hard-boiled eggs).
When I started seeing the yogurt recipes pop up, I was majorly intimidated again. I’m a fairly adventurous cook, but homemade yogurt had never been on my radar.

I tried the boil method first. So many people love it and swear by it. The yogurt tasted amazing, but the process itself? With the boiling and cooling and straining (I like thicker Greek yogurt), it was messy and time-consuming and I knew I wouldn’t repeat it regularly.
Then I tried the beautifully simple cold start method.
Now it’s my favorite healthy make-ahead breakfast recipe!
- 3 ingredients
- just a few minutes of prep
- budget-friendly
It tastes incredible and I am able to make a batch of Cold Start Instant Pot Yogurt for $4.90.
Of course, prices vary by area, but here in Northern Colorado if I watch for sales, I get the ingredients for:
- 52oz Fairlife 2% Milk for $3.50
- 16oz Natural Bliss Creamer for $2.79 (this lasts me 2 recipes)
- 2 Tbs of starter (I used plain Chobani to make my first batch, but have used starter from my previous batch every time since)
I can get a 5.3 oz container of Chobani for $1, which comes out to $0.18 per ounce while the Cold Start Instant Pot Yogurt is only $0.08 per ounce.
My husband and I love having a small (4oz) jar of yogurt with a piece of whole wheat peanut butter toast for breakfast. It’s our go-to, so I have been making a batch of this yogurt about every other week to make sure we always have some on-hand.
Instant Pot Greek Yogurt Recipe
First, gather your materials.
- I am madly in love with both these 4oz mason jars and 8oz mason jars (I love using the 8oz jars for overnight oats, too!).
- I use the 6-Quart Instant Pot DUO Plus for this recipe (I love everything about this kitchen appliance!).
- You can use the normal canning lids that come with the jars, but many people prefer to use plastic, reusable lids for yogurt.
- Most cold start recipes call for whisking your ingredients together in a large bowl, but I like to use a large Rubbermaid pitcher to shake all of my ingredients together so that it is easy to pour into the jars.

Can I Use A Different Kind Of Coffee Creamer?
The reason I used Natural Bliss coffee creamer is because it’s made with milk. For the cold start method, you have to be really careful about the ingredients to make sure the cultures will grow properly to make yogurt.
I know some people use sweetened condensed milk, but I prefer the Natural Bliss.
My husband has a major sweet tooth, so I wasn’t sure if I could get away with only using half a container of the creamer (some people use the full container), but we both love it with just one cup of sweetener. It’s not overly sweet, but it has great flavor (and we often eat it with fruit, which also adds sweetness).
We use the vanilla flavor most often, but I have a salted caramel batch in my pot right now for the first time and I have a bottle of the pumpkin spice flavor in my fridge to try next!
*Note – You can leave the creamer out altogether if you’d like to make plain yogurt. Less sugar is always healthier, but the sweetness in the creamer makes it much more enjoyable for us.
Why Do I Need To Use Ultra Pasteurized Milk?
Regular milk has some bacteria in it that needs to be removed before you make yogurt. You can use regular milk for the boil method, but not for cold start yogurt! The ultra-pasteurized milk goes through a heating process that kills all of that bacteria, so it’s ready to use without needing to be boiled first.

How to Make The Yogurt
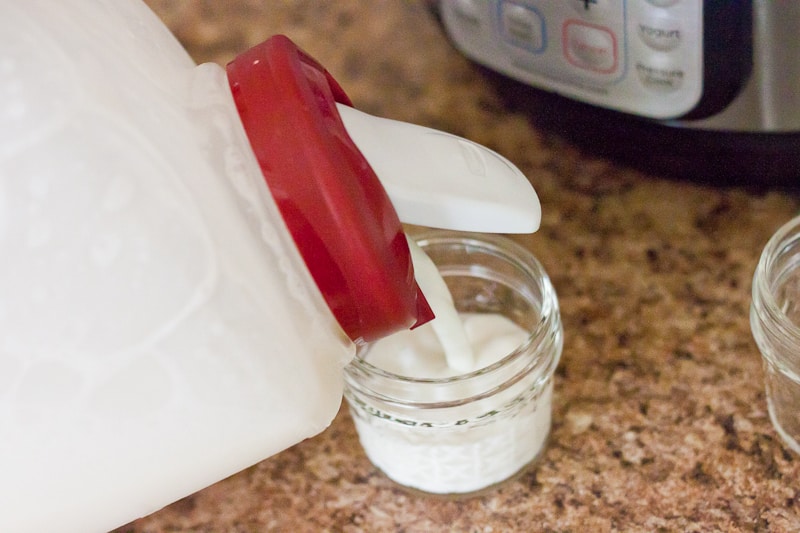
Pour the milk, creamer, and starter into the pitcher and shake it up well so that its’ all combined.
Then pour the mixture into the jars. I use 4 8oz jars and 9 4oz jars. They fit perfectly in my Instant Pot that way!
Pour a cup of water into the insert of your Instant Pot.

Then carefully place your first layer of jars into your pot.
*Note – I used to only put the small jars on the bottom, but I found every once and a while, a large jar or two wouldn’t set in a batch (which is still kind of a mystery to me!). Now, I place my 4 large jars on the bottom later and that seems to have helped!

Then place the rest of the jars on top of the first layer with the jars resting on the rims of the jars below.
*Important note – Make sure you place the 8oz jars at the front of your Instant Pot. If you place them around the back, the lid might not close because they bump into the bottom of the pressure valve.
Since this recipe doesn’t use pressure, you can also use a glass lid if you have one!

***UPDATE*** I’ve found that the larger jars set better when I put them on the bottom, so I have a new stacking method to get them all to fit.
Aside from putting the 4 large jars on the bottom layer, I also twist the metal rings onto the 3 smaller jars and stack the top jars directly on top of those three. See the images below.


How Long Do I Cook It?
Press the yogurt button and set the timer.
The amount of time you choose affects the tartness of your yogurt.
8 hours will make your yogurt less tart.
10 hours will make your yogurt more tart (some people even swear by 12 hours!).
I’ve found that either 8 1/2 or 9 hours works best to create the taste and texture we love.
*Note – Sometimes one or more of the larger (8oz) jars don’t set for some reason when the whole rest of the batch is perfect (including some of the large jars).

When the cooking cycle is done, you simply remove the Instant Pot lid, cover your jars and move them to the refrigerate to set overnight (don’t skip that part!).
Some people cover their containers with foil to avoid the condensation, but I’ve never had a problem with it. If you’d like, you can pour off any extra condensation before you refrigerate it. There’s never been enough condensation for me to worry about that step, though!

Aside from the waiting during the cooking and cooling, this recipe only takes about 10 minutes of actual time to mix, pour, and move the jars to the refrigerator.

That thick texture is the best part of all! No straining necessary.
*Fun Fact – Did you know Greek yogurt is just like regular yogurt, but with some of the whey removed? That means Greek yogurt is thicker, more concentrated, and has more protein while regular yogurt is thinner but has more calcium and carbs.


Instant Pot Greek Yogurt Recipe {Cold Start} | Healthy Instant Pot Recipes for Breakfast
This Cold Start Instant Pot Greek Yogurt Recipe is an easy and budget-friendly choice for a healthy Instant Pot recipe for breakfast.
Ingredients
- 1 (52 oz) container Fairlife 2% milk
- 1 cup Natural Bliss coffee creamer (any flavor)
- 2-3 Tbs yogurt starter (either plain store-bought yogurt like Chobani or from a previous batch)
- 1 cup water
Instructions
- Mix together milk, creamer, and starter in a large container.
- Pour into mason jars.
- Pour 1 cup water into Instant Pot insert.
- Gently stack mason jars in pot.
- Close lid, press yogurt button, and set time for 8-10 hours (8 1/2 hours is our favorite).
- When yogurt cycle is complete, remove jars, cover with lids, and move to the fridge for yogurt to set overnight.
Notes
*The milk MUST be ultra-pasteurized to work with this method and the yogurt needs to be made with milk and live and active cultures are a must. Plain Chobani, Oikos, and Fage work well.
**Adapted from this recipe by Frieda Loves Bread, the creator of the Cold Start method.
Weight Watchers/WW Freestyle - 6 smart points
Nutrition Facts

I calculated the nutrition facts to show about the same serving size as a 5.3oz storebought yogurt container, but we obviously get more servings out of this recipe since we use the 4oz jars.
It’s perfect for us, but feel free to adjust this for your family. I calculated the nutrition facts using My Fitness Pal, which was especially easy for this recipe, seeing as there were only 3 ingredients!
*Note – You can use reduced fat Fairlife milk, but know that it will affect the texture. Your yogurt will be much thinner and will not have the thick, Greek yogurt texture as shown in the picture above.
If you are following Weight Watchers, each serving is 6 WW Freestyle smart points.
Like This Recipe? Pin It!


More Healthy Breakfast Recipe Ideas
- Try these Instant Pot Egg Bites for a delicious way to start your day right.
- Or keep some Instant Pot Hard Boiled Eggs on-hand for a healthy snack full of protein! These eggs are so easy to peel!
- Looking for a breakfast recipe that doesn’t use an Instant Pot? Try this Sweet Potato Breakfast Skillet.
- Feeling something sweet? Try our Healthier Fluffy Pancakes recipe!


Do you ever do all 4 oz. jars? I would like to make it with all small jars.
Angie, the only reason I don’t use all 4 oz jars is that logistically I couldn’t get them all to stack well. You might be able to come up with a way that I didn’t think of!
I use 3-24 oz heavy straight sided plastic jars with good results. Why do you use water in outer pot? I noticed some sites use water and trivet and you have jars in the water. I have ordered 740ML (24 oz) glass jars and do not have room for trivet and would have to leave off gasket to close lid.
Hi Lynn! The only reason I use the water is because it seems to help heat the yogurt more evenly. You certainly don’t need it since this recipe doesn’t use pressure, but after a few test sessions, I just preferred it with the water!
I have a female name but I am a 92 year old male with experience in design engineering. I just made pip yogurt with 3-24 oz heavy straight sided plastic jars. 2 were good and one runny. I uwonder if these jars should be sterilized instead of just washed. One site said 2 cups of water steam 3 minutes and air dry in clean rack. I have just received an order of 4-25 oz mason jars that 3 will fit. I have not been adding the water but will next time to see if there is uniform heat. I accendentally printed out your 36 page blog. Love your approach and will follow some of your other recipies.
I haven’t sterilized the jars, but it sure couldn’t hurt! Thanks for your kind words, Mr. Harton.
Have you tried using any of the packaged cultures, e.g., Cultures for Life with this method?
Hi Jimmy! No, I haven’t tried using packaged cultures with this method. Just plain ol’ storebought yogurt (or leftovers from the previous batch).
Gave 5 Stars bc I believe the problem i had is due to not running the yogurt cycle long enough. It didn’t have enough twang. That being said, my daughter isn’t a fan of Greek yogurt, but she loves this slightly strained! I’m pretty certain its the texture of Greek yogurt that she dislikes. Your recipe is creamy. The Bliss creamer (I used 1c Sweet Cream) made the yogurt just sweet enough for her. I’ll know more over next few days to determine whether it’s low enough in sweetness to prevent my husband’s glucose levels from climbing (albeit I’ve added some chopped naturally sweetened peaches). The grocery store down from our subdivision were out of plain Chobani yogurt so I used 2T of peach ‘fruit on the bottom’ tho scooped around the fruit. I love it too tho I did strain my portion.
In addition to what I’ve frozen tho start next batch (unless i start w a small container of actual plain Chobani), I’ve got whey to use & extra strained for cream cheese that I hope to use as spread or baking ingredient. Will definitely use this recipe again! My first attempt at Instant Pot boil method messed up bc I didn’t realize the yogurt setting went to ‘less’ instead of Normal. 😯😢 So happy this attempt did so well. 😊👍😋
Hello, is it possible to use small plastic containers instead of mason jars?
Hi Nat! I’ve never used plastic containers myself. I know I’ve seen “Instant Pot yogurt kits” that include plastic containers that are used for pot in pot yogurt recipes like this, but I’m not sure if there are certain specifications that make them special for the job or not.
Do you have to put in jars before you cook?
Hi Benita, no! You don’t have to put it in jars before you cook. You can make it right in your pot in a large batch following the same instructions. Just make sure to leave out the cup of water!
I have made cold start yogurt numerous times (Fairlife, Almond vanilla Bliss, Silk vanilla almond yogurt) in both my 8 at and my 3 qt.. I’ve never had a problem with it setting up until today. Today was the first time I have divided it into jars. I was able to do three layers in my 8 qt (4oz. jars) and then the leftovers into my 3qt (1 layer). The 3 qt IP came out perfect. Only the bottom layer came out of the 8 qt. worked. I now have those that didn’t work going for an additional 4 hrs. So, any idea why it didn’t work and is it safe to extend the cook time 4 hours?
Hi Chris! For as many times as I’ve made this recipe, I still have random times when it doesn’t set. I’ve read up as much as I can on the subject as well as tested all kinds of things and I still don’t have all of the answers. It seems like it sets more consistently in the 3-qt pots because they are smaller and can keep a more consistent temperature. I’ve had a time or two when only the bottom layer set, even in my 6-qt and my guess is that it has something to do with the temperature. I believe the water in the bottom of the pot helps create a more even pot temperature, but doesn’t always ensure 100% setting. I personally wouldn’t increase the time by 4 hours because I think it would create too tangy of a flavor for my tastes. I’m honestly not sure on the food safety end. I’m assuming it should be fine since the Instant Pot should still maintain the safe incubation temperature the entire time.
With this recipe can I use Almond Coconut milk.
Hi Marilyn, the milk you use in this one is pretty specific, so my guess is that it wouldn’t work. When I looked it up, it does look like almond coconut milk is ultra-pasteurized (at least, the Blue Diamond refrigerated variety is), but I’ve heard of people trying to use non-dairy milks with this process and not getting great results, so just be warned that it might not set up!
Have you tried adding a little.powdered milk to make yogurt thicker? Someone said 1/2 cup per quart of milk. This seems like a lot.
I haven’t tried this! When I want this yogurt to be thicker, I just turn the jars on their sides or angle them and a lot of the liquid drains to the top. Then I just pour it off before eating. But I rarely even do that!
Hi Becky,
When making this recipe do you set the valve to vent or sealing? I didn’t see that information in your instructions.
Thank you… I can’t wait wait to try this.
Hi Lindsay! This recipe doesn’t come to pressure, so it doesn’t matter! Many people choose to use glass lids. I use the normal lid not set to sealing, but really the lid is just fo covering the pot for this recipe.
I made this recipe today for the first time. I let mine go for 9 hours. I wasn’t sure of how long they needed to refrigerate because it just says overnight. But I put them in the fridge to cool for 3 hours and I just had to try one. AMAZING!!!! They all came out perfect, no condensation to remove. I did scrape the bubbly foam off the tops. I am excited for the next batch!!! 🙂
I had a lot of foam after I mixed the ingredients. Skim it off or pour it in? Thanks!
Hi Donna! I pour the foam in! I don’t usually pull out the jars until after I’ve mixed up the milk, so the foam usually settles a bit in the time it takes me to get the glasses ready. But I pour in any leftover foam!
I’ve made yogurt a handful of times and it’s was super delicious every time….. until yesterday! It didn’t set. Any ideas why? The only differentiations can think of is that I usually do 8 hours but this last time I left it for 10 hours. Same ingredients too! Help!
Hi Tabitha! I’m so sorry it didn’t set for you! I have had this happen twice randomly and I just don’t have a solid answer for you as to why! It’s possible something got into the mixture that prevented the live cultures from doing their thing. I’ve read of that happening to some people. I’m so sorry I don’t have a clearer answer!
Do you need to drain it off afterwards to make thicker Greek yogurt? How long if you do?
Hi Ash! I never drain the yogurt because it’s quite thick already. But, I unintentionally found out that if you set your mason jar on its side (sometimes mine get knocked over in the fridge), more liquid will drain out of the yogurt, making it even thicker. So, when you want to eat it, just pour off the whey and it’s ready to go! No need for a separate container or anything. Hope that helps!
Do you have to use the jars or can you do it all in the pot?
You don’t have to make it in jars. It should come out just the same if you do it all in the pot – just make sure not to add the cup of water!
I accidently bought chocolate milk. So I’ll try chocolate yogurt! Do you think I still need to add the sweetened condense milk. I use 1/2 can per batch. I add the yogurt to the jars after it’s cooked. I might have to try your method!!!
I’d be careful with the chocolate milk! It sounds like it would taste delicious, but I’ve heard it doesn’t set up the same way, so it may turn out much thinner than your other batches. I don’t think I would add any extra sweetener with the chocolate milk. With my husband taking a container of yogurt to work most days, incubating it inside of the jars has made it so much easier for us! Thanks, Julie!
Hi! This looks awesome, I’ve done a very similar recipe in the instant pot itself. Do you know if this can be done that way too and not in the jars(though they seem very convenient!)?
Hi Jackie! Yes! You can definitely just pour all of the ingredients into your Instant Pot insert without the jars. Just don’t add the water on the bottom, but follow the rest of the directions like normal.
Becky, I a have a Power Xl pressure cooker with no yogurt button. Can you describe how hot and long your yogurt process is so maybe I can use something else on my machine to do this Thanks
Hi Michelle, I had to google the answer to your question because I had no idea what temperature the yogurt setting ran! From my search, it sounds like Instant Pots keep the pot between 106°F – 113°F on the yogurt setting. I like to keep mine in there for about 9 hours, though some who like a tarter taste go between 10-13 hours. I hope that helps!